
Alexandre Masino
Êtres de Jade I, 2010
Encaustic monotype on Kozo paper
During the First Annual Encaustic Painting Conference in 2007, I attended Paula Roland's presentation on Encaustic Monotype and I was hooked right away on the idea of exploring this unique technique. My head was spinning with the possibilities and the different series I would develop with this approach. It took me a few years to get to it as I was busy working on different exhibitions. Finally, this year I tackled the project and it is now my pleasure to post this long article on the subject.

Before going into details, I have to thank Paula Roland for sharing her knowledge and for devoting a lot of energy into teaching and promoting Encaustic Monotype. Without attending her different demos at the conference over the last 3 years, all what you are about to read would not have happened. I strongly believe in sharing the different techniques we develop and I truly don't think it is to our advantage to keep for ourselves any tricks, thinking they make us unique and guarantee even a small place in the art world.
More than fifteen years ago, my mother, the flutist Gisèle Millet, was organizing weeklong master classes with New York based flutist Robert Dick. He is an amazing composer, musician and a true pioneer in developing new ways of flute playing. It is by attending his concerts and master classes that I became truly convinced that knowledge is made to be taught and shared.

Encaustic Monotype:
Encaustic monotype is a contemporary medium combining the ancient art of encaustic painting with the general concept of monotype. This technique was innovated by New Orleans' artist Dorothy Furlong Gardner, who first showed an Encaustic Monotype in 1980. In 1991 she was awarded a grant by Daniel Smith to publish her process in Inksmith, a printmaking newsletter. To read more about the development of this technique and her own technical advices please consult her website.
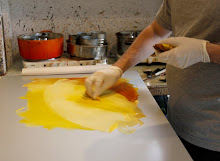
The basic elements of this technique are simple: paint with encaustic sticks on a hot plate in order to transfer the image on paper. Since the plate is hot, the medium remains fluid and does not dry instantly as in traditional encaustic. This simple fact allows us to easily transfer the image on paper and to repeat the process until we obtain the desired result.

In this technique there are many different variables to play with (or curse against) while we work :
1. The paint sticks are made with pigment, dammar resin and beeswax. The pigment density must be much higher than in usual encaustic paint because in this case, the paint is applied really thinly.
2. The heat of the table must be between 70°C to 95°C (160°F to 200°F). Depending on the heat, the wax will react differently and create various effects.
3. The type of paper used and its absorption quality makes a huge difference in the result. I love to work with really thin paper, Japanese Kozo paper is what I have been using and I'm presently researching various types of Japanese paper.
This technique is easy enough to produce a result; it is a different story to obtain the result you are looking for. Here's my setup and ways of working…
The heating table (hot box):
The first step to explore this technique is to purchase or build a hot plate. It must be completely flat and you have to be able to precisely control the temperature. Paula Roland is selling hot boxes through her website and this year she will even sell them in the vendors room at the conference. Personally, I have built myself a table last summer; it is time an energy consuming but now I have the advantage of working on a table that truly suits my needs. The concept is simple; light bulbs (100 watts) linked to a dimmer incased in an isolated wooden box heating an anodized aluminum plate. It is obviously crucial to think of fire hazards while building such equipment; get proper isolated electric wires and ceramic light fixtures.

My table is rather large so I have 8 light bulbs heating the surface, separated on two different dimmers. On the edge of my table I have put a thin rim in order to clamp down my papers and make sure they remain registered for each passage. The way I work is to tape my Kozo paper onto larger Newsprint, which allows me to work in the center of the plate.
The Encaustic sticks:
Ever since I started to paint with encaustic, I have made my own paint and medium. The paint sticks needed for monotypes are basically the same; beeswax, dammar and pigment. The crucial difference is that the density of pigment has to be much higher. I'm not giving formulas since each pigment reacts differently and the amount needed varies accordingly. I'm a big believer in the importance of knowing your medium, feeling it and understanding it from within. Safety issues also need to be high on your list, knowing what we work with includes knowing their level of health hazards. When working with any type of fine dust, wear a proper respirator. As an example, I will just mention that one of the first signs of poisoning yourself with dry pastel dust is depression. If you are using them and feel down after producing a show, it may not only be the post-partum effect….

To produce proper encaustic sticks we need molds. You can make your own molds (for Dorothy Furlong Gardner techniques, click here), use bread stick molds or even use long ice cube silicone molds. From my experience, the problem with those is that the edges of the sticks are going to be a bit sticky and porous. Before undertaking my production of paint sticks I did research, seeking the best solution for this matter from different friends working with metal, to advert shoppers, to people working in restaurants. That's when Vincent Deshaies proposed to lend me a crayon mold. He is the owner of Kama Pigments, where I buy all my raw materials. I deeply thank him, the results I have been getting with this is absolutely great. They are time consuming to produce and to unmold but I am not making large quantities, so I am a happy man.

The advantage of using crayon shaped sticks is that you can use the point for fine mark making and the side to cover large areas. Next to my hot plate, I have cans of molten wax in which I have warm brushes to do touch ups or add a different type of mark.

Alexandre Masino
Vagues de pierres I, 2010
Encaustic monotype on Kozo paper
10” x 31.5” / 25.5 x 80 cm
Evans Encaustics are richer in pigment than other manufactured paint. They are produced in order to add medium to them accordingly to our needs. For encaustic monotypes, this could be an alternative to making your own paint from dry pigments.
The great advantage of the monotype is the constant fluidity of the wax and the possibility to work substractively. In order to do this I use rags, paper towels but mostly the rubber tools sold for acrylic paint. With these I achieve negative lines and I can rework the contour of a shape when needed. Any tool that won’t scratch your aluminum plate will work.
In order to rub the paper on the plate, I use a Speedball baren or a rustic Japanese bamboo one. To keep it clean as much as possible, place aluminum fold over the surface so the wax doesn't get through it.
These are basically the tools I use. R&F Paints is selling a thermometer that can be placed on your hot plate to display the accurate temperature. You may also use a laser thermometer to know the actual temperature of all your components. Personally, I don't like to ask myself what the numbers should be when I work... By looking at how the wax reacts on the plate and by putting my hand close to the surface, I can feel my way through. Sometimes the plate is too hot and it is important to allow air to flow under it to cool it down. On the other hand, if the plate is not hot enough you need to increase the light intensity.

All my monotypes are created with many passages; I will paint on the plate and apply the paper at least six times if not more. They are thin layers and do not always cover the entire paper. The important thing is to make sure that the paper is not over saturated with the wax. Just like when I'm painting, I usually start with the background and work my way through the representation of the subject, the details, and then rework the image as a whole.

Alexandre Masino
Brumes lumineuses I, 2010
Encaustic monotype on Kozo paper
13” x 20” / 33 x 51 cm
There are a few difficult aspects of doing representation with Encaustic Monotype. There is obviously the fact that all the mark makings are reversed and the problem of knowing precisely where to paint on the plate, in correspondence to where the paper will fall. After the paper is applied for the first time, the "ghost image" remains somewhat visible on the aluminum plate. This is really useful in adding information to the print and making sure the new marks end up at the right place. Other times, I wipe out the remain image completely to produce new, clean and vibrant colors. When I do wipe off the plate and want to verify that everything re-aligns, I sometimes use a stencil cut out in Newsprint. They are not precise as the wax may disperse but with some tweaking, they usually get the job done.


Alexandre Masino
Ce feu du soir II and Vers le soir I, 2010
Encaustic monotype on Kozo paper
11" x 17 / 28 x 43 cm


